
- - - picture: Christmas card - -

sleep

abc
Showing posts with label Christmas card. Show all posts

Saturday, December 17, 2011

Cartoon santa


Cartoon Santa Step by Step

Cartoon Santa

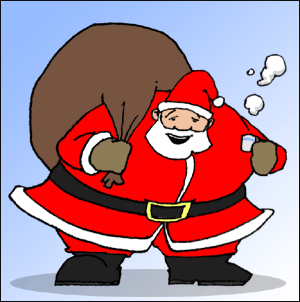
Cartoon Santa drawing might seem harder than it really is, but have no fear as soon as you finish this tutorial you'll know that there isn't really all that much to him.

As usual, we'll break him down to simple shapes and build on those shapes to create a very jolly, very fat cartoon Santa.

One last note - remember to draw lightly when making your first lines on the page. I know I say this with every lesson but some of my students don't seem to listen to this important steps and when it is time to finish the drawing they always have problems erasing because they drew too hard in the beginning.

Got your pencil and eraser handy? Let's do it!
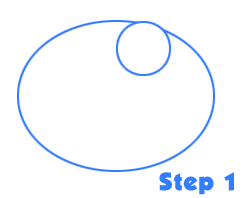
cartoon santa step 1Step 1:
Draw two overlapping circles. The smaller one will be the head, the larger one will be the main part of the body. Note that the larger circle is squashed a little so it is not a perfect circle. Looks strange right? Keep reading and we'll flesh him out.

Since this is an intermediate tutorial I'm going to cover quite a few things in each of the following steps. If your drawing isn't looking right go back and read over the step carefully.
cartoon santa drawing step 2Step 2:
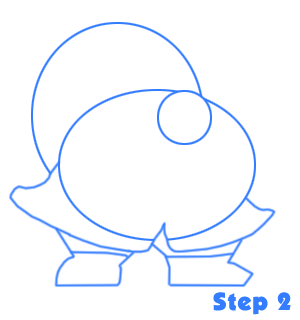
Add another circle shape behind the first two circles that you made. This will be the cartoon Santa's giant sac of toys.

First add in the lines to create the bottom of the coat. Notice that there is a little space between the middle of the coat at the bottom.

Add in shapes for the legs and boots. The foot on the left side of the drawing (Santa's right) is facing forward. The foot on the other side of the drawing is facing to the side. Draw a line to separate where the pant leg and the boot meet.
cartoon santa drawing step 3

Step 3:
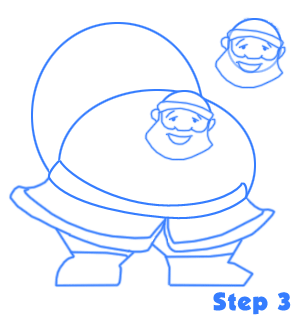
Let's add some details to his face. I've included a version of the face with the old circle still there so you can have reference of where some of these new lines are being drawn.

Cut off the top of the head circle and create the white band at the bottom of the cartoon Santa's hat.

Draw lines down from the bottom of the hat to make the beard. It should be curved along the bottom in a similar shape to the original head circle - only bigger.

Draw in the nose with a simple 'U' shape, and then connect another line down from the hat to the nose to make the inside of the beard.

Draw a smile in the beard - it's just another 'U' shape with a line on top.

To make the eyes, make one line, and then, under the line make a little black circle. Add in some happy looking eyebrows. If you want your cartoon Santa to have a different expression the shape of the mouth and the eyebrows can be changed.

Next, draw in the curved lines for his belt. For now don't worry about the belt buckle - we'll add that in the next step. Just draw lightly so that you can erase these lines later.

Last part of this step, I promise! Add in the bottom white part of his coat. Notice how these parts connect with the bottom of the belt. That was a long one - I hope you're not getting discouraged! Let's keep going - we're almost finished the cartoon Santa.
cartoon santa drawing step 4Step 4:
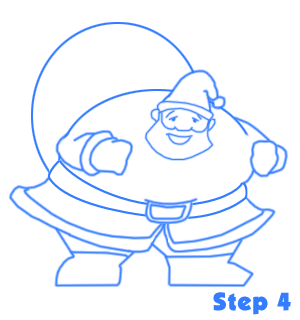
Finish off the head by adding in the top of his hat and the little white pom-pom circle at the end.

Add in the belt buckle with two rectangular shapes one smaller than the other. Make the line on the very top of the belt a little longer to show that Santa's fat belly is trying to poke over his belt.

Add in the arms with simple curved shapes. His left arm is shown more from the side and will be holding his sac. His other arm is shown from the front and will be holding a cup of hot chocolate. Because he is wearing mittens these hand shapes are really simple to draw. If you are having problems drawing them, I suggest looking at your own hand.

Make a fist and notice the outline shape of your fist from the front and also from the side. Use this outline as a reference, but remember that if you were wearing mittens that the shape wouldn't be as clear as just looking at your hand. Make the outline shape a little softer and more curvy and you should have a pretty good looking hand to work with.
cartoon santa drawing step 5Step 5:
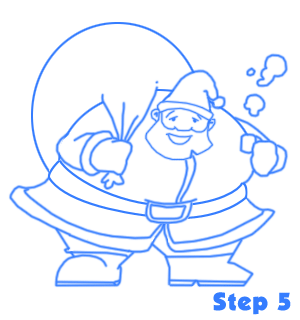
Let's finish off this cartoon Santa with a few last details.

Add in the little cup of hot chocolate, and some steam rising out from it. The cup is kind of like a square, but it has a rounded top and bottom to show that it's a cylinder shape. The steam is just a random bubbly shape. Draw it however you wish. If you think of it more simply, it's just a bunch of circles lumped together.

Add in the lines for the sac of toys going from just past his shoulder down to his hand. These lines should come together as they move toward his hand to show that the sac is being held tightly. Add a little shape to the bottom of the sac-holding hand to show the end of the sac.

I cut a little pointed shape out of the beard to make it more interesting. Feel free to do the same. Near the cut in the beard I also started the two lines that would make the center of this cartoon Santa's coat. These lines should travel down from the beard to where the belt buckle is.

The last details I added were on the feet. I added a little bulge to his right leg to make the area where the pants meet the boots a little more interesting. I also added a detail line to the foot here to indicate the toe of his boot. Notice the thin line along the bottom of the boot? This is the bottom of the boot. On his left leg, I cut out a little area to separate the heel and the toe of the boot.




christmas

Saturday, December 10, 2011

Sunday, December 4, 2011

Christmas card

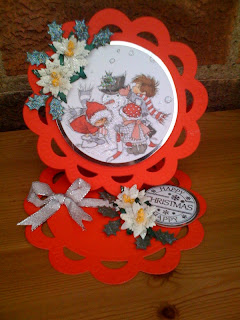
Card made from a Marianne Creatable die !!

Phew its been a busy week !!! I finally got to make a quicky card ............ roll on school starting again !!! hehe !!! Well I just love this die from Maria
nne. I folded a piece of card over in half and cut the die so it didnt cut the whole part of the outer pattern on one round, then cut two more so the the embbosing showed on the front and the base niceley !! I just love the effect it gives as a card !
!! The image is LOTV which I glittered up and stamped ticket from Whimsy Stamps. Not sure who its for yet but you never know !!! I am entering it into Papertake weekly where there
has to be a dimension to your project !!
Hi here !! Well I joined the ladies in the Christmas Card gang, we make a card to a sketch each fortnight, here is the sketch we followed this time set by Pinky !! If you would like to join contact Clare who will give you all the details !!!


My card is a Lili of the Valley image off their new sheets. I am waiting for my craft stuff to be sent from the USA so I have limited things ................. I could only get so much stuff in my suitcase when I came home !!! Mmm might have to go shopping again !!!! The papers are Nitwits, border punch by Martha Stewart and Pointsetta flowers from Wild Orchids. I glittered up the dress and stars and of course the flowers, added a bit of bling and there we go !!! I have also entered it into theSaturday Challenge, Christmas in spring have a look see !!

Sally has set us our next Sketch which we will all post our cards for on the 10th April !! Go check out all the great cards we made, the list of us is on the sidebar !!!!


Hope you like it !!! Have a great Sunday.
Well I made this with some of my new goodies from Harrogate !!! I was trying to make a card without flowers on ............. its just so easy to use them as they are so gorgeous !

The image is from Lili of the Valley which I glittered up, the tags are cut using Sentimentals cricut cartridge and the message is Lili of the Valleys new Friendship recipe stamp !!! Loving it !!! I also used a Marianne Die behind the image and a Martha Stewart punch for the border !!! Papers are from Nitwits, I was so thrilled it matches the colour of the girl image so well !!

A bit of bling and it will be in the post for my friend !


Well all ready for tomorrow and Birmingham !!! Whoop Whoop !!! No doubt we will all shop till we drop !!! hehe !!!! Have great fun !!!


Wow ......... well I think I am recovered now from Saturday and the Harrogate show !!! What a great day it was and what fabby things they had for us all to buy !!!! I am gearing up now for Thursday and Birmingham !!! hehe


Well I loved the Forever Friends card so much I made another one similar but using the Lili of the Valley printed cute square. I glittered her up and added the flowers (Wild Raspberry from K&Co......... hope I can get more thursday .....) and butterflies.


Hopefully I will get to play with my new toys today or
tomorrow !!! I am looking after my gran today s
o it will be tomorrow I guess !!! Hope you all had a great time at Harrogate !!!


Happy shopping Thursday !!!
Here there !!! Well here is my card for the Lili of the Valley Challenge. The challenge was to follow the sketch by Bev as you can see below. Check out her website its great !!!


Anyway ........... my card was created by using the fairy stamp from Lili of the Valley, ticket stamp from Whimsy stamps, flowers from Wild Orchid Crafts (have you seen their daffodils !!!! Cant wait to get hold of some !!), the lace I bought in Walmart and the paper is wrapping paper I got from the Post Office !!! Sadly they only had one sheet ............

verity cards

Birthday Recipe Shaped Easel card


Well ............ I have been laid in bed flat on my back for the last few days but today I sat in the chair with my card things on my knee and put together the bits I had ready to make these cards. I just needed something to do !!!! I had cut out the cards on my Grand Calibur using the Go-Kreate XXL dies ........... now I just NEED !!! the new Go-Greate nestable ones that match !!!

Its a friends birthday in the USA this week and I made this card for her. It is a LOTV image and recipe sentiment. The tag is a Doohickey tag, flowers from Wild Orchids and papers from Nitwits.

I have entered this into the following:
Allsorts Challenge - Free and Easy
Try it Tuesday - Flower power
Ruby's Rainbow - Anything Goes
Penny's Paper - Happy Birthday


I liked this design so much I made another birthday one in lilac and a couple of friendship cards; all use LOTV images. The last friendship card (last posting) was made for my friend in the USA, just as a hello, before I could post it I got an email saying how she may be out of a job this week ................ how strange we do things for someone just when they need it without knowing !!! Anyways I thought I would have a few ready as you just never know when you might need them !

Hope you like them too, Happy crafting !!!!


Well I thought I would make a card that wasn't for Xmas !!! I made 4 Xmas cards today,
all like the one below but I felt the need for something different !!!!

I thought I would send this to my good friend in the USA as I know she loves my cards and when I called to wish her happy 4th July I couldn't get her :( Don't want her thinking I forgot her !

This is a LOTV image, the recipe is a LOTV stamp, sorry ladies I took my craft knife to it and cut the frame off so I could get it on the tag !!! The tag is a Doohickey die. Flowers from Wild Orchid Crafts ! Papers are nitwits.

Hope you like it !!

I have entered this into the following challenges:
Sentimental Sundays - Anything goes
Party time Tuesdays - Square Cards

I got this image from Amy Ashers, it is designed by Card Buddy's. Its actually a plate design card but I decided to make it as a square card.

This is the first decoupage card I have made in a while but it was great fun doing it again. Not sure who is going to get this ............... we have a male family members birthday today but I cant really give him this !!! hehe !!! ah well a bought one for him today I am afraid !

Flowers and heart pins as usual from Wild Orchid Crafts, butterflies from The Range, greeting stamp from Lotv !!!

So nice to finally get a card made again !!!


I entered this into Totally Gorjus challenge - flowers, Joyful Stamper - anything goes,Papertake Weekly - anything goes


Oh, Ok ............... seems as though wedding fever is reaching everywhere !!!! So Igave in and agreed Caitlyn can watch it on tv so I guess its in my mind which is why when I sat down to make a friendship card I came up with this !!!!!!!!!!!!!!!!! Mmm !!!! Maybe I will do that tomorrow ........... on Grandma duty Fri and Sat so not much chance then !!! Bless her !


I got out my grand calibur and cut the fancy shaped card, the paper is wrapping paper from Tesco !! Dont know anyone getting married myself yet but I guess I can co-ordinate wrapping paper for a gift with the card when I do !!! Trusty flowers all glittered up and some pearls I got at such a bargain price from NEC !! 6 packs for a tenner !! 100 in a pack !!! BARGAIN !!


Thought I would enter it into the following challenges:
Craftyourpassion - Show us your layers
Shelly's Images - Show us what you've got
Diecut Dreams - Wedding
Delicious Doodles - Anything goes
Sparkles for fun - anything goes


Hi there everyone !!! Well it was so nice to sit at my desk yesterday and make a card ! I havent been able to just spend time making and playing properly for a while ......... well ok at least a week !!! hehe !!!


Keryn set the challenge this time and she provided a table for us to choose one thing out of each column. I chose poinsettia, red and ribbon to make my card from. The card is cut using a Marianne Die, LOTV image and sentiment, poinsettias from Wild Orchid crafts and I used a Martha Stewart puch for the holly. Out came the glitter glue and Bob's your uncle !!! Well actually he's not but he is my cousin !! Thanks Keryn for a great challenge I really enjoyed it. Go see the other ladies creations, you can see the gang listed on my sidebar !


The next challenge is set by Sylvie and its to use pink !!! Lovely !!! I just love the cards I have seen in the past for Christmas using pink and one other colour of our choice plus white ! So thinking cap on me reckons !!!


I am entering this into A spoonful of sugar - Lets celebrate
Delicious Doodles
- anything goes


Happy Easter everyone !!! I'm off to hide the eggs in the garden !!!
Phew its been a busy week !!! I finally got to make a quicky card ............ roll on school starting again !!! hehe !!! Well I just love this die from Marianne. I folded a piece of card over in half and cut the die so it didnt cut the whole part of the outer pattern on one round, then cut two more so the the embbosing showed on the front and the base niceley !! I just love the effect it gives as a card !!! The image is LOTV which I glittered up and stamped ticket from Whimsy Stamps. Not sure who its for yet but you never know !!! I am entering it into Papertake weekly where there has to be a dimension to your project !!
-